
Wheel nut indicators are small, highly visible devices fitted to wheel nuts that make it easy to spot movement, loosening, or potential wheel failure before it becomes a serious safety issue. They’re a simple solution with a big job. If a wheel nut shifts even slightly, the indicator shows it straight away, giving you a chance to act before things go wrong.
You’ll commonly see them on trucks, trailers, mining vehicles, and fleet utes. But they’re becoming more popular across 4WDs and work vehicles too. If you rely on your vehicle to get the job done, they’re one of the easiest ways to add an extra layer of safety.
Quick Summary
- Wheel nut indicators are visual safety markers fitted to wheel nuts
- They help detect loosening, movement, and overheating
- Common on heavy vehicles, fleets, and mine-spec vehicles
- Not generally required by law, but often required on sites and contracts
- Easy to install, low cost, and highly effective
- Do not replace proper torque checks or servicing
What Are Wheel Nut Indicators Used For?
Wheel nut indicators are used to detect loose wheel nuts before they cause wheel loss or damage. It’s that simple, and that important.
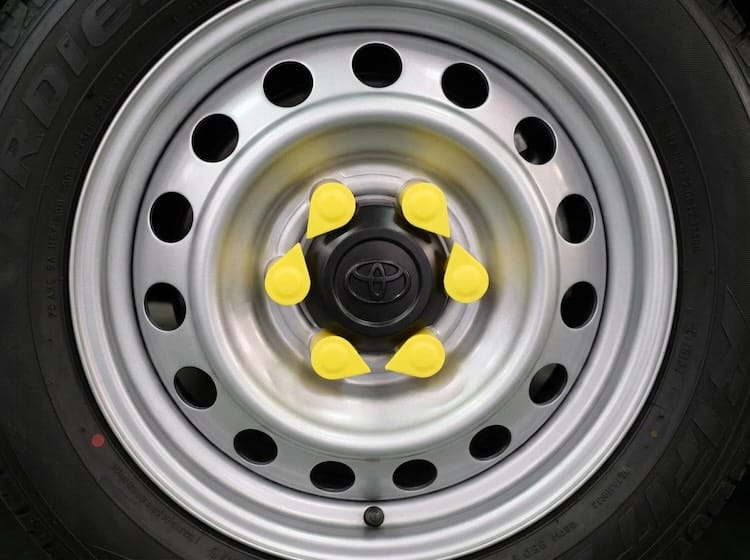
When installed correctly, all indicators are aligned in the same direction, usually pointing towards each other. If one nut starts to loosen, the indicator moves out of alignment, making the issue obvious at a glance.
This is especially useful for:
- Heavy vehicles covering long distances
- Fleet vehicles with multiple drivers
- Mining and construction vehicles on rough terrain
- 4WDs used for off-road or remote work
Think of them like a visual warning system. Instead of guessing or relying on feel, you get a clear, immediate sign something isn’t right.
They also help reduce:
- Wheel loss incidents
- Costly downtime
- Damage to studs, hubs, and wheels
- Safety risks to drivers and others on the road
How Do Wheel Nut Indicators Work?
Wheel nut indicators work by providing a visual reference point for movement.
Here’s how it plays out in the real world:
- Indicators are fitted over each wheel nut
- They are aligned in a consistent pattern, usually pointing in the same direction
- During operation, if a wheel nut loosens, it rotates
- The indicator moves with it, breaking the alignment pattern
- The misalignment is easily visible during a walkaround check
Some indicators also include a heat-sensitive feature. If the wheel hub overheats, often due to bearing issues or brake problems, the indicator can melt or deform. That gives you another early warning before a bigger failure.
A good way to think about it is like this. If your dash light comes on, you know something needs attention. Wheel nut indicators do the same thing, just visually on the wheel itself.
How To Measure Wheel Nut Indicators
Getting the right size matters. If the indicator doesn’t fit properly, it won’t stay in place or work as intended.
To measure wheel nut indicators, you need to know:
Nut Size (Across Flats)
This is the most important measurement. It refers to the width of the nut from one flat side to the other.
Common sizes include:
- 19mm
- 21mm
- 24mm
- 27mm
- 32mm
- 33mm
Thread Size And Type
While indicators don’t thread on, the nut type still matters. You need to ensure compatibility with:
- Standard hex nuts
- Flanged nuts
- Specialty wheel nuts
Clearance Around The Wheel
Make sure there’s enough space between:
- The wheel and hub
- Adjacent nuts
- Any hub caps or trims
If space is tight, you may need a low-profile indicator.
Practical Tip
If you’re unsure, remove one wheel nut and measure it directly or check manufacturer specs. Guessing here usually leads to the wrong fit.
How To Install Wheel Nut Indicators
Installing wheel nut indicators is straightforward, but it still needs to be done properly.
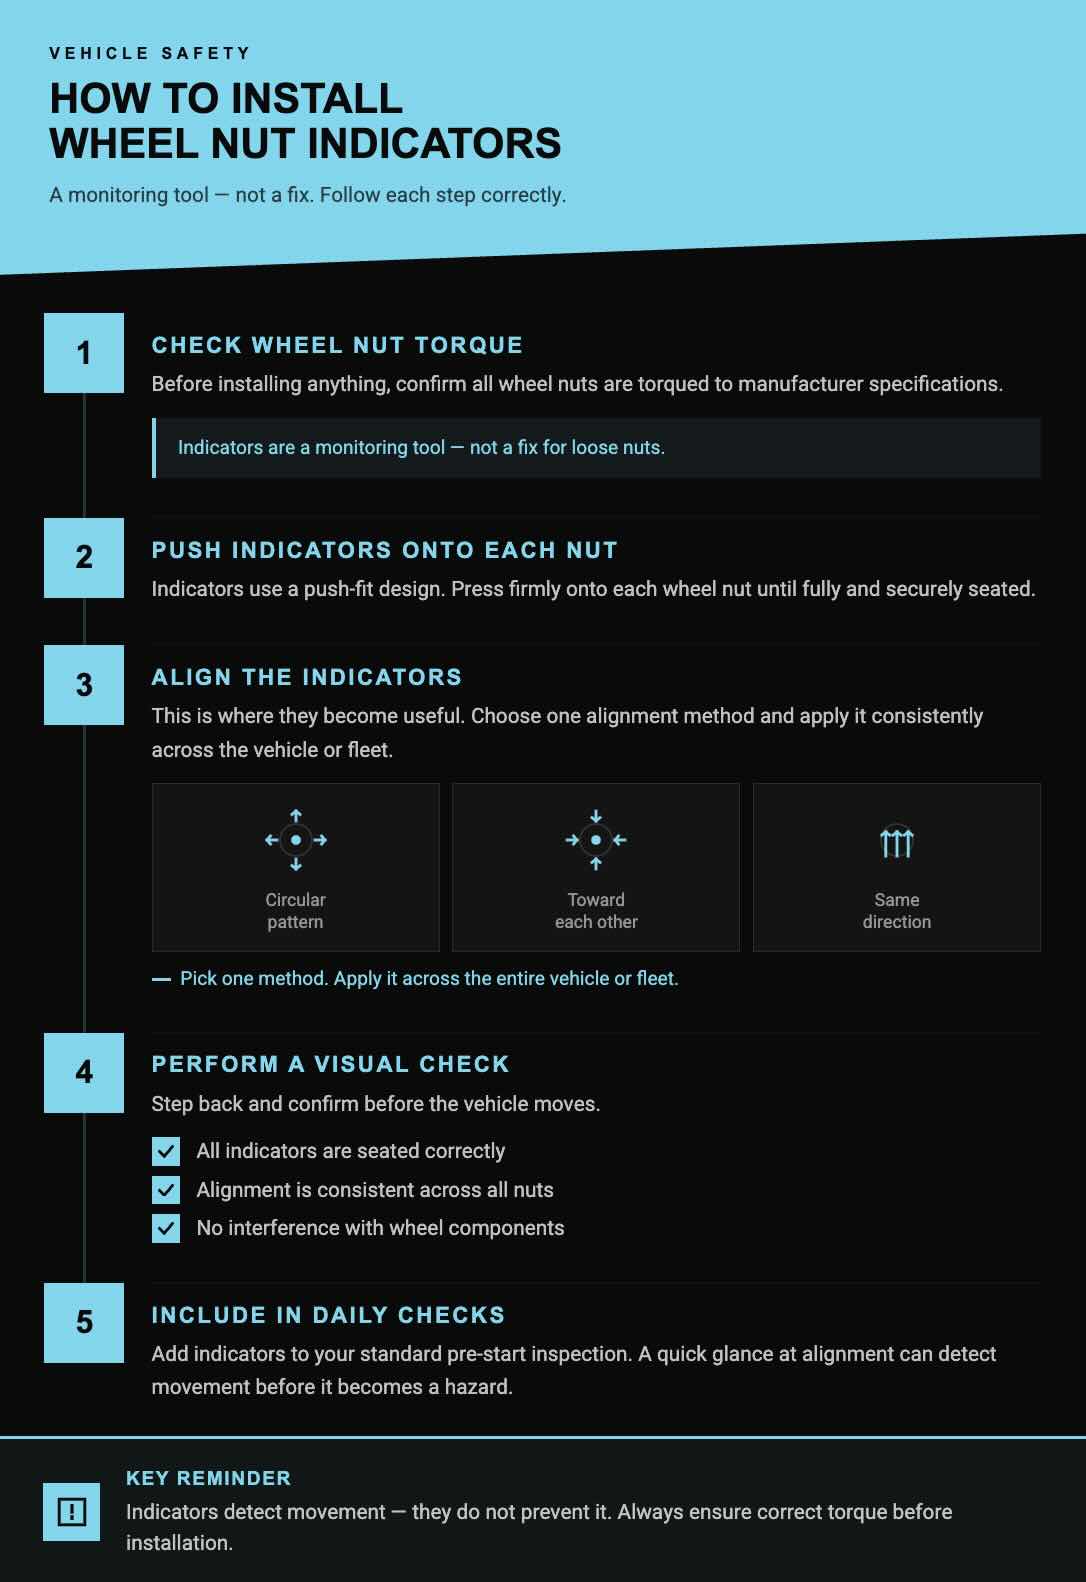
1. Check Wheel Nut Torque
Before installing anything, make sure all wheel nuts are torqued to manufacturer specifications. Indicators are not a fix for loose nuts. They are a monitoring tool.
2. Push Indicators Onto Each Nut
Indicators are typically a push-fit design. Press them firmly onto each wheel nut until secure.
3. Align The Indicators
This is where they actually become useful.
Common alignment methods:
- All pointing in a circular pattern
- All pointing towards each other
- All pointing in the same direction
Consistency is key. Pick one method and stick to it across the vehicle or fleet.
4. Perform A Visual Check
Step back and confirm:
- All indicators are seated correctly
- Alignment is consistent
- No interference with wheel components
5. Include In Daily Checks
Make indicators part of your standard pre-start inspection. A quick glance can save a lot of trouble.
Are Wheel Nut Indicators A Legal Requirement?
This is one of the most common questions.
The short answer is no, wheel nut indicators are not a universal legal requirement across Australia.
Australian vehicle laws focus on:
- Wheel security
- Correct fitment
- Roadworthiness
- Proper maintenance
They do not specifically mandate the use of wheel nut indicators for all vehicles.
Learn more: Mine spec vehicle requirements.
Where They Can Be Required
Even though they’re not broadly mandated, there are situations where they effectively become required:
Fleet And Company Policies
Many transport companies require indicators as part of internal safety standards.
Mining And Construction Sites
Mine-spec and site compliance rules often require wheel nut indicators, especially for vehicles operating in high-risk environments.
Government And Contractor Standards
Some contracts, especially in civil and infrastructure work, specify indicators as part of vehicle safety requirements.
The Reality
On paper, they’re not mandatory everywhere. In practice, if you’re operating in:
- Mining
- Civil construction
- Transport fleets
There’s a good chance you’ll need them.
Why They’re Worth Installing Anyway
Even if you’re not required to use them, wheel nut indicators are one of those upgrades that just makes sense.
They are:
- Cheap compared to potential damage
- Easy to install
- Quick to check
- Effective at preventing serious issues
For example, a loose wheel nut left unnoticed can lead to:
- Stud failure
- Wheel detachment
- Major repair costs
- Safety incidents
Compare that to a simple visual check during your daily walkaround. It’s an easy decision.
Common Mistakes To Avoid
Even though they’re simple, there are a few common mistakes that reduce their effectiveness.
Using The Wrong Size
If the indicator is too loose, it will fall off. Too tight, and it may crack or not seat properly.
Skipping Torque Checks
Indicators do not replace torque procedures. You still need to check and re-torque wheels as required.
Inconsistent Alignment
If indicators are not aligned properly, you lose the visual reference point.
Ignoring Movement
If an indicator moves, it’s not something to “keep an eye on later”. It needs to be checked immediately.
Wheel Nut Indicators For 4WDs And Work Vehicles
While traditionally used on heavy vehicles, wheel nut indicators are becoming more common on:
- 4WD touring setups
- Trade utes
- Fleet service vehicles
- Remote area vehicles
If you’re heading off-road or working in harsh conditions, they’re a smart addition. Corrugations, heat, and load all increase the chance of wheel nut movement.
Summary
Wheel nut indicators are a simple bit of gear that can prevent serious problems. They don’t replace proper maintenance, but they make it much easier to spot issues early.
If your vehicle works hard, travels long distances, or operates in demanding environments, they’re well worth considering. A quick visual check could be the difference between a smooth day on the road and a major breakdown.
If you’re looking to fit out your site or mine-spec vehicle and would like more tailored advice, get in touch for a free quote from our mine-spec vehicle fitout team in Perth.